
You need to replace your 3D printer’s hotend thermistor when you notice erratic temperature readings, sudden drops from operating temperatures to zero, or error messages like “THERMAL RUNAWAY” and “MINTEMP” appearing during prints. A failing thermistor can’t accurately monitor your hotend’s temperature, leading to print failures, poor layer adhesion, and wasted filament. Visual signs include burned or frayed thermistor wires that compromise the sensor’s functionality and create safety risks during operation. Understanding the replacement process guarantees consistent printing performance.
Signs Your Hotend Thermistor Needs Replacement
When your 3D printer’s hotend thermistor begins to fail, you’ll notice several telltale warning signs that shouldn’t be ignored. Erratic temperature readings on your display are major red flags—sudden drops from 200°C to 0°C indicate thermistor malfunction.
Sudden temperature drops from 200°C to 0°C on your display are clear warning signs of thermistor failure.
You’ll also receive error messages like “THERMAL RUNAWAY,” “MINTEMP,” or “MAXTEMP” during printing sessions. Your hotend may struggle to reach proper temperatures, causing print failures and poor bed adhesion.
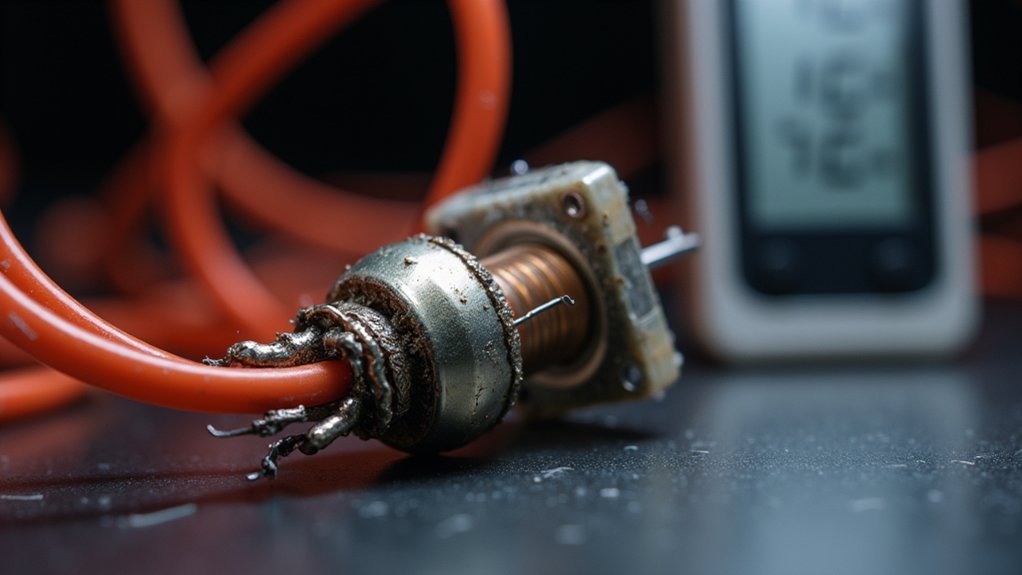
Visual inspection reveals compromised thermistor wires showing burns or fraying damage. Testing with a multimeter becomes essential—significant deviations from the expected 100kΩ resistance at room temperature confirm replacement necessity.
These symptoms compromise print quality and safety, making immediate thermistor replacement vital for reliable operation.
Understanding Thermistor Types and Compatibility
Before purchasing a replacement thermistor, you’ll need to understand the fundamental differences between thermistor types to guarantee proper compatibility with your 3D printer. Thermistors for 3D printers fall into two main categories: NTC (Negative Temperature Coefficient) and PTC (Positive Temperature Coefficient). The NTC thermistor decreases resistance as temperature rises, while PTC increases resistance with heat.
| Feature | NTC Thermistor | PTC Thermistor |
|---|---|---|
| Resistance Behavior | Decreases with temperature | Increases with temperature |
| 3D Printing Usage | Most common temperature sensor | Less common |
| Temperature Range | Up to 200°C | Varies |
| Popular Models | 100K NTC | Limited options |
| Firmware Compatibility | Brand-specific calibration | Varies by manufacturer |
Remember that compatibility isn’t universal—regular V6 thermistors won’t work with Prusa Mini models, requiring careful specification matching.
Tools and Materials Required for Replacement
You’ll need essential testing equipment like a multimeter to verify your thermistor’s resistance before and after replacement.
Your toolbox should include screwdrivers, Allen wrenches, wire cutters, strippers, and a soldering iron for the actual installation work.
Don’t forget safety gear including protective gloves and glasses to keep yourself safe during the replacement process.
Essential Testing Equipment
Success in replacing a 3D printer hotend thermistor depends on having the right tools and testing equipment before you begin. A multimeter serves as your primary testing equipment for verifying thermistors function correctly. You’ll need to test resistance values, which should read approximately 100kΩ at room temperature for NTC thermistors. This guarantees accurate temperature control after installation.
Beyond testing equipment, gather essential hand tools including screwdrivers and Allen wrenches for component disassembly. Wire cutters and strippers prepare connections, particularly when soldering’s required for secure installation.
Don’t overlook safety gear—gloves and safety glasses protect against burns and sharp tool injuries. Your printer manual provides vital guidance for specific replacement steps and safety precautions throughout the process.
Replacement Component Selection
Several critical components form the foundation of a successful thermistor replacement project. Your replacement component selection should prioritize a 100kΩ NTC thermistor, which guarantees compatibility with most 3D printers using PLA and ABS materials.
When choosing your new thermistor, verify it matches your printer’s specifications exactly. NTC thermistors are temperature-sensitive resistors that decrease resistance as temperature increases.
You’ll need wire cutters and a soldering iron if your replacement requires soldered connections. Don’t forget essential safety gear including gloves and protective glasses to prevent burns during installation.
Keep your printer manual accessible throughout the process. Having the right replacement thermistor and proper tools ready before starting prevents delays and guarantees you’ll complete the replacement efficiently without compatibility issues.
Safety Gear Requirements
Before handling any heated components or electrical connections, prioritize your safety by gathering essential protective equipment.
You’ll need heat-resistant gloves to protect your hands from burns when working around the hotend assembly. Safety glasses are vital for shielding your eyes from potential splatter during soldering or accidental contact with heated surfaces.
Your safety gear protects you throughout the thermistor replacement process, especially when testing electrical connections or handling heated components.
Don’t underestimate the importance of proper protective equipment – even a cooled hotend can retain residual heat that could cause injury.
Additionally, verify your workspace is well-ventilated if you’re soldering connections.
Keep your tools organized and within reach to minimize unnecessary movements around heated components, reducing accident risks.
Step-by-Step Thermistor Removal Process

Before you begin removing your thermistor, you’ll need to disconnect the power supply by turning off your printer and unplugging it from the wall outlet to guarantee electrical safety.
Next, access the thermistor location by carefully identifying where it’s positioned in your hotend assembly, typically secured near the heating block.
You can then remove the securing hardware by gently disconnecting the thermistor wires from the control board and unscrewing the retaining screw that holds the thermistor in place.
Disconnect Power Supply
Safety takes priority when working with electrical components, so you’ll need to completely disconnect your 3D printer from its power source before touching the thermistor. Turn off your printer’s main power switch and unplug the power cord from the electrical outlet. This prevents electric shock and protects both you and your printer’s circuitry.
| Step | Action | Purpose |
|---|---|---|
| 1 | Power off printer | Stops all operations |
| 2 | Unplug power cord | Eliminates electrical current |
| 3 | Wait 2-3 minutes | Allows capacitors to discharge |
| 4 | Verify no LED lights | Confirms complete power disconnection |
Thermistors operate within specific temperature ranges and contain sensitive components. Proper power disconnection guarantees you won’t damage these precision sensors during removal, maintaining their accuracy for future installations.
Access Thermistor Location
Locating your thermistor requires identifying the small sensor attached to either your hotend assembly or heated bed.
You’ll need to trace the thermistor wires from their connection point back to where they attach to your printer’s circuit board. This temperature sensor typically appears as a small glass bead or cartridge-style component secured within the hotend block or bed assembly.
Once you’ve identified the thermistor’s position, use a screwdriver to carefully unscrew the retention screw holding it in place.
Take extra care not to damage surrounding components during this process. Before removing anything, note the wire positions on the circuit board for proper reinstallation.
Gently disconnect the thermistor wires, then remove the sensor from its housing, watching for any debris that might impede removal.
Remove Securing Hardware
Start by identifying the retention screw that holds your thermistor within the hotend’s heat block—this small screw typically sits adjacent to where the thermistor enters the assembly.
Select the proper screwdriver size to prevent stripping the screw head, then carefully loosen and remove it while supporting surrounding components.
You’ll need to remove the thermistor gently once the hardware is freed, avoiding any wire strain that could cause connection issues.
If thermal paste or debris causes resistance, wiggle the component carefully rather than forcing it.
Before proceeding, examine the securing hardware for wear or damage—faulty retention can lead to thermal runaway situations affecting both your hotend and heated bed performance during future prints.
Installing and Calibrating Your New Thermistor
Position your new thermistor carefully within the heat block’s designated slot, making sure it sits flush against the internal surface for ideal thermal contact.
Installing your thermistor properly prevents temperature fluctuations and guarantees reliable readings throughout operation.
After installation, verify your firmware settings match the new thermistor’s specifications, as different models require distinct calibration values for accurate performance.
- Use a multimeter to check resistance at room temperature (~25°C) – it should read approximately 100kΩ for standard NTC thermistors
- Heat the hotend gradually to operating temperature and monitor display readings for stability
- Watch for fluctuations that could indicate faulty connections
- Run calibrating test prints to observe first-layer adhesion and temperature consistency
- Make firmware adjustments based on your specific material requirements
Testing Temperature Accuracy After Replacement
Once you’ve completed the physical installation, verifying your thermistor’s temperature accuracy becomes crucial for reliable 3D printing performance. Start by setting your hotend to 100°C and confirm the display reading matches. Use a multimeter to check resistance at room temperature—standard NTC thermistors should read approximately 100kΩ at 25°C.
| Temperature Test | Expected Result | Action if Incorrect |
|---|---|---|
| Room temperature resistance | ~100kΩ at 25°C | Replace thermistor |
| 100°C heating test | Smooth temperature rise | Check wiring connections |
| Test print monitoring | Consistent readings | Recalibrate or replace |
Gradually increase temperatures while watching for fluctuations. Run a small test print to confirm thermistors maintain consistent readings throughout. Monitor for “THERMAL RUNAWAY” or “MINTEMP” errors, which indicate accuracy problems that compromise temperature accuracy and print quality.
Frequently Asked Questions
How Do I Know if My 3D Printer Thermistor Is Bad?
You’ll notice erratic temperature readings jumping between extremes, frequent “THERMAL RUNAWAY” or temperature errors, poor heating performance, visible wire damage, or multimeter readings markedly different from 100kΩ at room temperature.
What Happens When a Thermistor Goes Bad?
When your thermistor goes bad, you’ll see erratic temperature readings, get thermal runaway errors, experience poor print quality, face material adhesion problems, and risk potential overheating that could damage your printer.
What Does a Thermistor Do on a 3D Printer?
Your thermistor monitors your hotend’s temperature by changing electrical resistance as heat varies. It sends precise temperature data to your printer’s control board, ensuring accurate heating control for successful prints.
What Is the Point of a Thermistor?
You need a thermistor to accurately measure temperature changes in real-time. It converts thermal energy into electrical signals, enabling precise temperature control for safety, preventing overheating, and ensuring peak performance in various applications.


Leave a Reply