
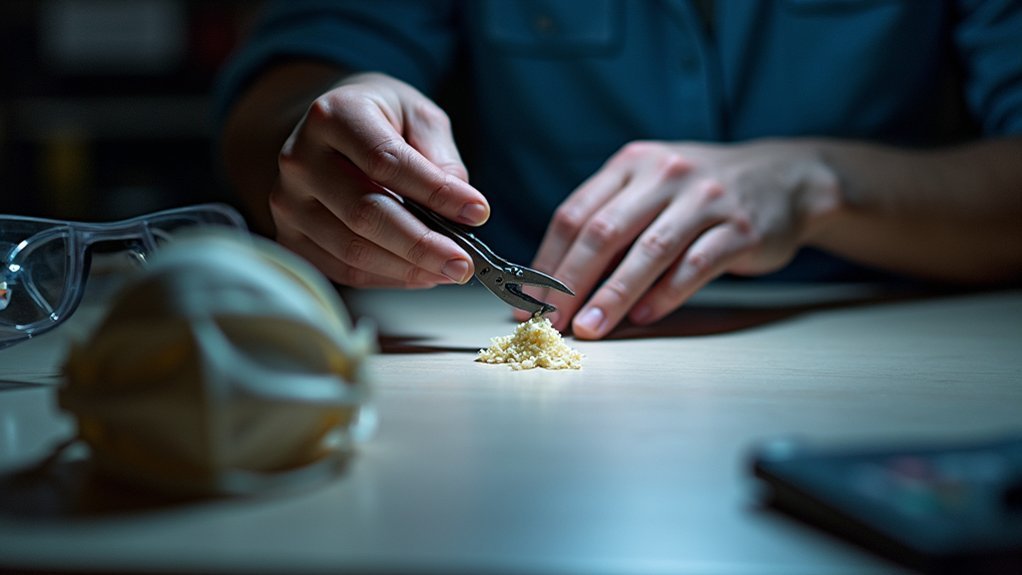
You’ll need needle-nose pliers, tweezers, and flush cutters to remove internal supports from your 3D prints. Start by ensuring your print has cooled completely, then use pliers to twist and pull supports with gentle wiggling motions. For stubborn material, apply heat from a heat gun at 150-200°C from 2-3 inches away to soften the supports. Use a craft knife for precision cuts and sandpaper to smooth rough edges afterward. Our extensive guide covers advanced techniques for complex geometries.
Understanding Internal Support Structures and Their Purpose
The intricate dance between gravity and molten plastic creates unique challenges when 3D printing complex geometries. You’ll encounter situations where overhangs, bridges, and internal cavities require additional scaffolding to prevent collapse during the printing process.
Internal supports serve as temporary foundations that maintain structural integrity while your printer builds layer by layer. Your slicing software automatically generates these support structures by analyzing your model’s geometry and identifying areas that can’t support themselves.
These supports aren’t permanent fixtures—they’re designed for removal once printing completes. The software calculates ideal placement, density, and patterns based on your model’s specific requirements.
Without proper internal supports, you’d face sagging features, collapsed channels, warped surfaces, and failed prints. Understanding their purpose helps you configure them effectively for successful printing outcomes.
Tools Required for Internal Support Removal
Now that you understand why internal supports exist, you’ll need specific tools to remove them effectively without damaging your finished print.
Needle-nose pliers are your primary weapon for gripping and twisting support material in tight spaces where larger tools can’t reach. An X-acto knife provides precision cutting capabilities, allowing you to access stubborn structures without harming surrounding areas.
Flush cutters excel at making clean breaks close to your print’s surface, eliminating unwanted material efficiently. Tweezers become invaluable for extracting tiny remnants from hard-to-reach internal cavities.
Finally, keep sandpaper handy to smooth any rough edges left behind after removal. These essential tools will guarantee you can tackle any internal support removal challenge while preserving your print’s quality and detail.
Safety Precautions When Working With Small Spaces
While precision tools make internal support removal possible, working in confined spaces creates unique hazards that demand careful attention to safety protocols. You’ll encounter risks from flying debris, sharp edges, and limited visibility that can lead to injury or print damage.
| Safety Equipment | Purpose | Key Benefit |
|---|---|---|
| Safety goggles | Eye protection from debris | Prevents particles from sharp tools |
| Gloves | Hand protection | Reduces cuts from edges and tools |
| Adequate lighting | Clear workspace visibility | Minimizes accident risk |
Always equip yourself properly before starting. When using a heat source like a heat gun to soften stubborn supports, exercise extreme caution to prevent burns. Take your time with precision tools—rushing increases the likelihood of slips that can damage your print or cause injury.
Manual Removal Techniques for Tight Areas
Once you’ve established proper safety measures, specific manual techniques become your primary tools for maneuvering confined spaces within 3D prints.
Needle-nose pliers offer exceptional grip and precision, letting you twist and break off material in tight areas with complete control. A craft knife excels at making precise cuts around small, stubborn supports that larger tools can’t reach effectively.
Precision tools like needle-nose pliers and craft knives provide the control needed for removing supports in tight spaces.
Flush wire cutters provide the sharpness needed to cut supports close to your print’s surface without damaging surrounding material. Consider heating your knife blade to soften more flexible filament supports, making removal considerably easier.
Above all, patience proves essential—gently wiggle and loosen supports before attempting removal to minimize any risk of damaging your printed part.
Using Specialized Tools for Deep Hole Extraction

When you’re dealing with supports trapped in deep holes that are 3-4mm in diameter, you’ll need specialized tools that can reach into these confined spaces effectively.
Small needle-nose pliers offer the precision and grip strength necessary to maneuver within tight areas and extract stubborn support material.
You can also use a 3-4mm drill bit as a reaming tool to gently clear out remnants without damaging your print’s surrounding material.
Needle Nose Pliers
Needle nose pliers excel at extracting stubborn internal supports from deep cavities where fingers and larger tools can’t reach. Choose pliers with fine tips that easily navigate 3-4mm diameter holes typical in most printed models. The pointed ends provide precise control when grasping supports buried up to 30mm deep within your print.
During the support removal process, gently wiggle the needle nose pliers while pulling to loosen stubborn material. This technique reduces the risk of damaging your printed model’s surrounding surfaces. The leverage these pliers provide makes removing supports from hard-to-reach areas markedly easier than attempting extraction with other tools.
Always wear safety goggles when removing supports with pliers, as debris can fly unexpectedly during the extraction process, protecting your eyes from potential injury.
Drill Bit Techniques
Drill bits offer a powerful solution for accessing internal supports trapped in holes deeper than 30mm where traditional tools fall short. A 3-4mm drill bit designed for plastic materials will remove supports through precision extraction without damaging your print.
You’ll need to maintain low drilling speeds to prevent overheating and melting. Start with a smaller pilot hole to guide your larger bit, ensuring accurate placement and easier removal of stubborn internal supports.
Keep your drill bit sharp to minimize cracking or warping during the process. After drilling, inspect the hole’s interior for remaining fragments. Use a hobby knife or tweezers to clean out any debris, achieving a smooth finish.
This technique transforms impossible support removal into a manageable task.
Heat Application Methods for Stubborn Support Material
While mechanical removal methods work for most support materials, some stubborn supports require a different approach that involves controlled heat application.
Heat application methods can effectively soften thermoplastic supports, making removing support material notably easier without damaging your print.
Set your heat gun or soldering iron to 150-200°C for ideal results. Maintain a safe 2-3 inch distance from your print to prevent overheating or warping. Apply heat slowly and gradually, allowing stubborn support materials to soften before attempting removal. This prevents you from applying excessive force that could damage your print.
Always verify proper ventilation during support removal, as melting materials can release harmful fumes.
This controlled heat approach transforms difficult extractions into manageable tasks.
Soluble Support Options for Complex Internal Geometries
When traditional removal methods fall short, soluble support materials offer an elegant solution for complex internal geometries that would otherwise trap conventional supports inside your print.
PVA or HIPS provide exceptional ease of removal through dissolution, eliminating the need for physical access to internal structures.
PVA works perfectly with dual-extrusion printers, dissolving completely in water without leaving residue behind. It’s ideal for PLA prints requiring intricate internal features.
HIPS requires limonene solution but offers superior strength for ABS applications where high temperatures and durability matter.
To optimize dissolution, maintain your bath temperature between 60°C to 80°C. Adding movement to the solution accelerates the process considerably.
These printing supports dissolve away entirely, revealing complex geometries that would be impossible to achieve with traditional support removal methods.
Step-By-Step Process for Removing Supports From Narrow Channels
Tackle narrow channel support removal by first ensuring your print has cooled completely to room temperature. This prevents the support material from bonding more firmly to your print surfaces.
Use small needle-nose pliers or tweezers to grip supports within narrow channels, applying gentle twisting motions while pulling to avoid damaging surrounding areas.
Gentle twisting motions with needle-nose pliers help extract narrow channel supports without damaging surrounding print surfaces.
For stubborn supports, carefully drill out the material using a 3-4mm drill bit set to low speed to prevent overheating. Apply heat to soften particularly difficult support material when necessary.
Once you’ve completed the removal process, inspect your narrow channels thoroughly and use a craft knife or file to clean away any remaining support remnants, ensuring smooth, professional-looking channels.
Dealing With Broken Support Fragments Inside Prints
Sometimes support fragments break off during removal and become lodged inside your print’s internal cavities or narrow passages. When you encounter stubborn broken support pieces, grab small needle-nose pliers to carefully extract them without damaging surrounding material.
For hard-to-reach fragments, use a 3-4mm drill bit to widen access points, making removal easier. Apply gentle heat around the broken support area to soften the material, reducing stress on your print during extraction.
A craft knife works well for carefully cutting away fragments while minimizing damage risk. The removal of supports requires patience when dealing with stubborn pieces.
After removing all visible fragments, thoroughly inspect the internal structure to remove remnants that could compromise your print’s functionality or appearance.
Surface Finishing After Internal Support Removal
After you’ve removed all internal supports, you’ll need to address the rough surfaces and imperfections left behind.
You can choose from several finishing techniques, including sanding and filing for mechanical smoothing, chemical methods for certain materials, or aesthetic treatments like priming and painting.
The right combination of these approaches will transform your print from a support-marked prototype into a polished final product.
Sanding and Filing Techniques
Transform rough, scarred surfaces left behind by internal supports into smooth, professional-looking finishes through strategic sanding and filing.
Start with filing to remove larger imperfections and blobs where supports attached, giving you controlled precision for surface finishing. Follow with progressive sanding grits, moving from coarse to fine to eliminate rough textures systematically.
Use a sanding block on flat surfaces to maintain even pressure and achieve uniform results across previously supported areas. This prevents uneven spots that can mar your print’s appearance.
Clean your print thoroughly after completing these processes to remove dust particles that could interfere with subsequent treatments.
Apply primer before painting sanded surfaces to enhance adhesion and create a durable, visually appealing final product that showcases your 3D printing skills.
Chemical Smoothing Methods
Chemical smoothing methods offer an efficient alternative to mechanical finishing techniques when you need to eliminate stubborn surface imperfections left behind by internal supports.
These chemical solutions can greatly improve your surface finish after support removal.
Essential Chemical Smoothing Guidelines:
- ABS prints – Use acetone vapor smoothing to reduce layer lines and support marks considerably
- PLA prints – Apply ethyl acetate solution to dissolve minor protrusions without major material loss
- Timing matters – Limit exposure to just a few seconds to prevent warping or melting
- Safety first – Always wear gloves, goggles, and guarantee proper ventilation when handling solvents
- Follow-up work – You’ll likely still need sanding or filing to achieve perfect polish and remove attachment marks
Chemical smoothing methods provide excellent results when used correctly and safely.
Aesthetic Enhancement Options
Once you’ve successfully removed internal supports from your 3D print, you’ll want to focus on achieving a professional-looking finish that completely eliminates any trace of their presence.
Start by sanding the surface with 120 to 220 grit sandpaper to smooth rough areas left behind. Apply a filler compound to fill gaps and imperfections, creating a uniform surface for finishing.
Use primer before painting to enhance adhesion and guarantee even color application on previously supported areas. For ABS prints, chemical smoothing agents like acetone can dissolve surface imperfections while creating a glossy finish.
Finally, consider applying a clear coat after painting to add depth and protection, giving your print a polished, professional appearance that rivals injection-molded parts.
Preventing Internal Support Issues Through Design Optimization
While removing internal supports can be challenging, you can greatly reduce these difficulties by optimizing your design from the start. Smart design optimization prevents problematic internal supports before they’re generated, saving you time and frustration during post-processing.
Smart design optimization prevents problematic internal supports before they’re generated, saving you time and frustration during post-processing.
- Enlarge access holes and openings to reduce the need for internal supports while improving tool access for any remaining material removal.
- Incorporate tapered or sloped features to minimize overhangs beyond 45 degrees that typically require support structures.
- Design drill-like internal holes that are slightly wider than support material for easier extraction.
- Optimize print orientation to leverage gravity, reducing supports in internal cavities and improving platform adhesion.
- Adjust support settings in your slicer by decreasing density and minimum support area to minimize internal supports generated during printing.
Slicer Settings to Minimize Internal Support Requirements
You can markedly reduce internal support requirements by adjusting your slicer’s overhang angle settings to generate supports only when angles exceed 45 degrees or your printer’s specific capabilities.
Tree supports offer another powerful configuration option that creates more efficient support structures while minimizing material waste and post-processing difficulty.
These strategic slicer adjustments work alongside proper support placement settings to eliminate unnecessary internal supports before they’re even printed.
Overhang Angle Optimization
Although most 3D printers can handle overhangs up to 45 degrees without support, adjusting your slicer’s overhang angle setting to a more conservative 30 degrees will greatly reduce internal support requirements while maintaining print quality.
Enhancing your overhang angle settings involves several key strategies:
- Lower the overhang threshold to 30 degrees, allowing your printer to handle steeper angles without generating unnecessary internal supports.
- Fine-tune support placement to target only critical areas near the build plate rather than throughout the entire model.
- Experiment with support density between 10-15% to find the sweet spot for your specific printer and filament.
- Test different overhang angles for your printer’s capabilities to establish effective settings.
- Combine angle adjustments with strategic model orientation to minimize support generation.
This approach reduces material waste while simplifying post-processing.
Tree Support Configuration
Tree supports offer a revolutionary approach to 3D printing that can dramatically reduce internal support requirements through intelligent branching algorithms.
You’ll want to configure branch angles between 30-45 degrees to optimize placement while maintaining stability. Set your support density to 10-20% to minimize material usage and simplify removal from tight internal spaces.
Enable the support interface feature in your slicer to create denser contact layers that enhance removal ease.
Adjust your Z distance setting to create slight gaps between supports and your model, ensuring smoother removal without compromising structural integrity.
Configure your support overhang angle around 45 degrees to reduce unnecessary internal support generation for manageable overhangs, resulting in cleaner prints with fewer supports.
Troubleshooting Common Internal Support Removal Problems
When internal supports won’t budge from your 3D print, you’re likely facing one of several common issues that can turn a simple post-processing step into a frustrating ordeal.
Here are proven solutions for difficult removal:
These battle-tested techniques will help you tackle even the most stubborn internal supports without damaging your print.
- Use specialized tools – Needle-nose pliers and precision tweezers reach tight spaces where standard tools can’t access.
- Apply controlled heat – Warm tightly bonded support material to soften it without damaging your print.
- Break up stubborn supports – Small drill bits safely fragment internal support structure in complex geometries.
- Trim remaining bits – Hobby knives eliminate leftover remnants that affect functionality and appearance.
- Prevent future problems – Adjusting slicer settings like increasing Z-distance creates gaps for easier removal post.
Always inspect thoroughly after your removal post to confirm no fragments remain hidden.
Frequently Asked Questions
How to Remove Supports From Inside 3D Prints?
You’ll gently wiggle supports with needle-nose pliers first, then use flush wire cutters at their base. For stubborn pieces, apply heat to soften them, and use tweezers with craft knives for precise extraction.
Can You Dissolve PLA Supports?
You can’t effectively dissolve PLA supports since PLA isn’t water-soluble. Acetone and other solvents won’t work and may damage your print. You’ll need to manually remove them using tools or switch to soluble support materials.
What Are the Best Pliers for Removing 3D Print Supports?
You’ll want needle-nose pliers for tight spaces and precision pliers for delicate work. Choose ones with non-slip grips and narrow jaws that’ll give you better control when removing supports.
What Is the Easiest Support Pattern to Remove?
Tree supports are your easiest option since they’re branch-like with fewer contact points. You’ll find low-density settings make any pattern simpler to remove, but soluble PVA supports eliminate manual removal entirely.
Leave a Reply