
You’ll achieve professional jewelry quality by mastering critical exposure parameters—bottom layer times for platform adhesion and normal layer exposure to prevent detail fusion. Select high-quality resins designed for jewelry printing, orient models at 45-degree angles to eliminate moiré effects, and maintain daily calibration checks for intricate designs. Progressive polishing from coarse to fine grits, followed by rigorous quality control testing against CAD specifications, guarantees your pieces meet luxury standards that transform basic prints into market-ready jewelry.
Understanding Critical Exposure Parameters for Jewelry Printing

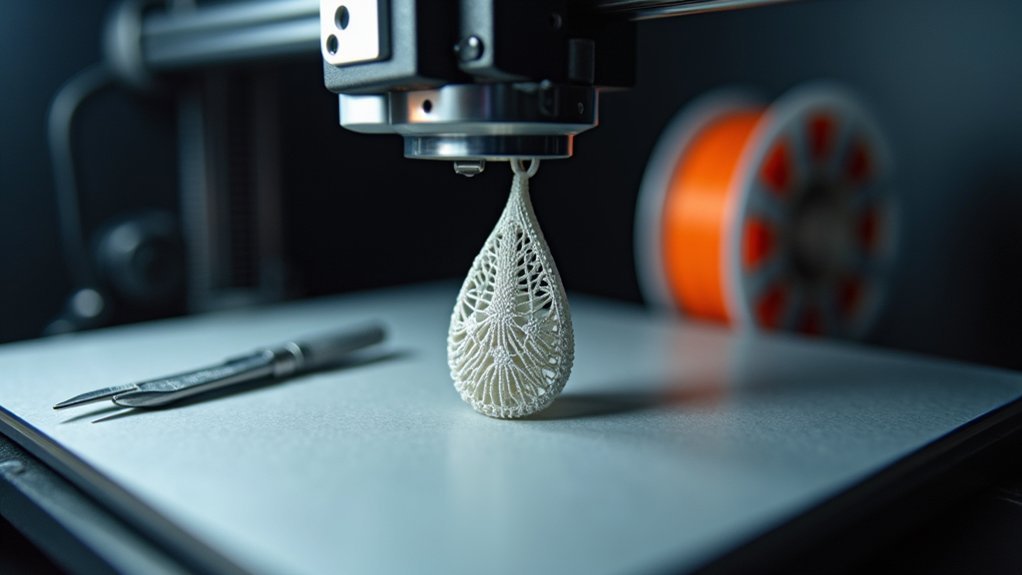
When you’re 3D printing jewelry, exposure parameters determine whether your delicate designs emerge as masterpieces or expensive mistakes.
You’ll need to calibrate bottom layer exposure time carefully to guarantee strong platform adhesion without affecting your layer height precision. Normal layer exposure time requires equally precise tuning—too long and you’ll fuse intricate details together, too short and you’ll get incomplete curing that compromises print quality.
Precise exposure calibration balances platform adhesion with detail preservation—too long fuses features, too short causes incomplete curing.
Don’t overlook light-off delay, which prevents layer shifting in complex geometries. Your resin’s UV sensitivity must match your printer’s capabilities for best results.
Use test models with micro-details to evaluate your settings before committing to expensive production runs. Remember, each adjustment affects the balance between structural integrity and fine detail resolution in your finished jewelry pieces.
Selecting the Right Materials and Resins for Quality Results
Perfect exposure settings mean nothing if you’re working with subpar materials that can’t deliver the precision and durability your jewelry designs demand.
You’ll need high-quality resins specifically formulated for jewelry printing to achieve superior detail retention and ideal surface finish. These specialized resins guarantee your intricate patterns remain crisp and your surfaces stay smooth.
Consider materials like Nylon PA12 or stainless steel for enhanced tensile strength and longevity. Metal-filled filaments offer authentic weight and appearance while accepting polished finishes that elevate your jewelry’s aesthetic appeal.
For flexible pieces like bracelets, TPU provides comfort without sacrificing durability.
Don’t overlook thermal characteristics when planning casting processes—understanding how your chosen materials respond to heat directly impacts your final product’s durability and professional finish quality.
Optimizing Model Orientation to Minimize Defects
Although high-quality materials form your jewelry’s foundation, you’ll compromise even the finest resins if your model orientation creates unnecessary defects during printing.
Strategic model orientation dramatically improves surface finish by positioning smooth areas at ideal angles, reducing visible layer lines that mar your jewelry’s appearance.
Proper model positioning transforms rough layer lines into smooth, professional surfaces that showcase your jewelry’s premium quality.
You’ll achieve better structural integrity by aligning stress-prone design elements parallel to the z-axis, preventing cracks and failures during printing.
Minimize support structures wherever possible—they leave unwanted marks requiring extensive post-processing.
Experiment with tilting models 45 degrees in both XZ and XY planes to eliminate moiré effects and enhance detail clarity.
Always print test samples in various orientations before committing to final production runs, allowing you to identify potential issues early and guarantee consistently high-quality results.
Calibrating Your Printer for Consistent Performance
Beyond optimizing your model’s position, your printer’s mechanical precision determines whether those carefully oriented designs translate into flawless jewelry pieces.
Regular calibration guarantees consistent print quality by checking component alignment, accuracy, and performance before each print. You’ll need to focus on bed leveling, nozzle height, and material flow rates since improper settings cause warping, misalignment, and poor adhesion.
For intricate designs requiring stringent tolerances, perform daily calibration checks. When switching materials or adjusting settings, recalibrate immediately.
Fine-tune bed leveling and nozzle height when using smaller nozzles or slower speeds for detailed work. Remember that calibration problems often stem from the printer itself rather than process parameters, making regular maintenance and component monitoring essential for achieving professional jewelry results.
Managing the Moiré Effect in Fine Detail Work
You’ll encounter moiré patterns when your printer’s layer resolution conflicts with fine design elements, creating unwanted visual interference that can ruin your jewelry’s appearance.
These patterns form when repetitive structures in your design align imperfectly with the printer’s layering system, producing wavy or rippled effects across surfaces.
You can minimize this issue by strategically orienting your models and understanding how layer alignment affects pattern formation.
Understanding Moiré Patterns
When fine design elements in your 3D-printed jewelry interact with the printer’s layered construction, they can create an unwanted visual phenomenon known as the moiré effect. This occurs when intricate patterns, textures, or mesh-like structures don’t align properly with your printer’s layer height, resulting in wavy, rippled, or interference patterns that distort your intended design.
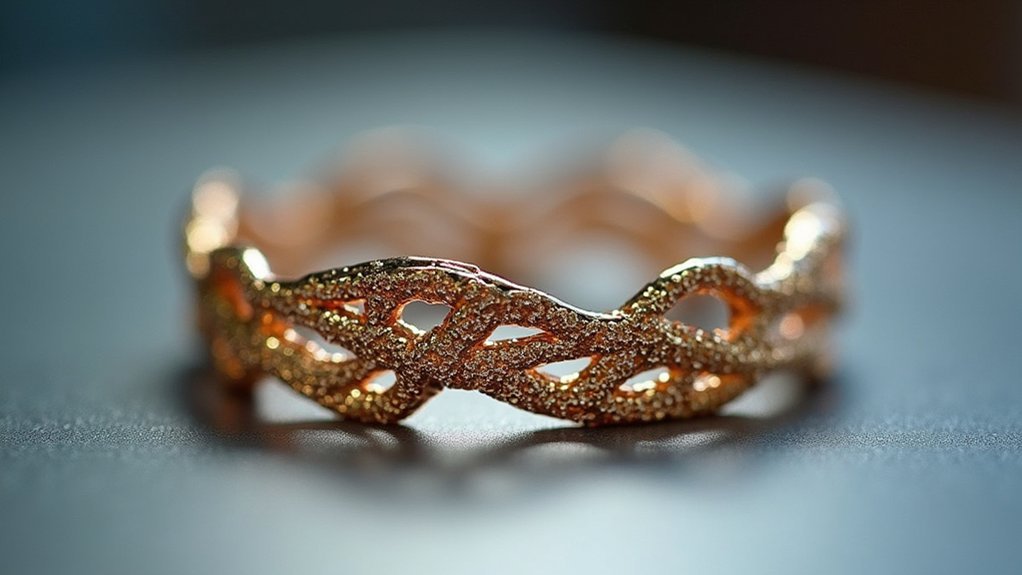
The moiré effect becomes particularly problematic when your design features repetitive elements like filigree work, chain links, or geometric patterns. These patterns clash with the printer’s layer resolution, creating visual artifacts that can ruin an otherwise perfect piece.
Understanding this phenomenon is essential because it affects how you’ll approach design modifications, printer resolution settings, and post-processing techniques.
You’ll need to recognize when moiré patterns appear in your prints to implement the right corrective strategies.
Mitigation Through Orientation
One of the most effective ways to combat moiré patterns lies in how you position your jewelry model on the print bed.
Strategic orientation disrupts the alignment between intricate design features and printed layers that creates the moiré effect. You’ll achieve ideal results by tilting your model 45 degrees in both XZ and XY planes, breaking the problematic parallel relationships with build direction and stepper motor movements.
This angular positioning redistributes layers uniformly across multiple axes, greatly improving print quality.
Don’t settle for default orientations—experiment with various angles during slicing to find what works best for your specific design.
Combined with increased printer resolution and proper scaling adjustments, thoughtful orientation transforms potentially flawed pieces into crisp, professional jewelry with enhanced structural integrity.
Essential Post-Processing Techniques for Professional Finishes
Five critical post-processing techniques separate amateur-looking 3D-printed jewelry from professional pieces that customers will treasure.
You’ll transform rough prints into stunning accessories through systematic refinement.
Sanding creates the foundation for excellence.
Start with 100-200 grit sandpaper to eliminate layer lines, then progress through finer grits up to 2000 for smooth surfaces.
Polishing brings metal-filled filaments to life.
You’ll achieve brilliant metallic sheens using specialized polishing compounds designed for metals, creating that coveted professional appearance.
Clear coating provides essential protection while enhancing visual appeal.
Choose glossy finishes for dramatic shine or matte options for subtle elegance.
- Acetone vapor smoothing creates glassy ABS finishes (ensure proper ventilation)
- Acrylic painting adds vibrant custom colors to PLA, ABS, and PETG pieces
- Progressive sanding builds from coarse to ultra-fine grits systematically
Polishing Methods for Different Material Types
Since different 3D-printed materials respond uniquely to polishing techniques, you’ll need specific approaches to maximize each material’s potential. Metal-filled PLA transforms dramatically with polishing compounds, delivering a brilliant metallic appearance for high-quality 3D printed jewelry. Nylon PA12 achieves an elegant white finish when properly polished, perfect for sophisticated designs.
| Material | Polishing Result | Key Benefit |
|---|---|---|
| Stainless Steel 316 | Enhanced shine from granular surface | Professional metallic appearance |
| MultiJet Fusion PA12 | Smooth, comfortable texture | Improved wearability |
| Alumide | Increased shine with design considerations | Balanced aesthetics and durability |
Each material requires tailored techniques to achieve a polished finish. You’ll find that proper polishing transforms raw prints into flawless jewelry pieces that meet professional standards.
Advanced Coloring and Plating Options
You can transform your 3D-printed jewelry’s appearance through sophisticated multi-color dyeing methods that work particularly well with Nylon PA12 and MultiJet Fusion materials.
Metal plating techniques like rhodium and pink gold application will elevate your pieces while adding durability and corrosion resistance.
You’ll need to focus on proper surface preparation requirements since they’re critical for achieving professional-grade coloring and plating results that last.
Multi-Color Dyeing Methods
When you’re ready to elevate your 3D-printed jewelry beyond basic single colors, multi-color dyeing methods open up a world of creative possibilities that can transform simple prints into stunning, professional-grade pieces.
You’ll achieve a superior finish on your detailed jewelry through strategic color application techniques.
Your multi-color options include:
- Immersion dyeing – Submerge sections of your piece in different dye baths to create distinct color zones and gradients.
- Airbrushing techniques – Apply precise color patterns and shading effects for intricate surface details.
- Direct printing with colored resins – Layer different colored materials during the printing process for seamless color integration.
Each method offers unique advantages depending on your material choice and desired aesthetic outcome for your finished pieces.
Metal Plating Techniques
While multi-color dyeing transforms your 3D-printed jewelry’s appearance, metal plating techniques offer the supreme upgrade that’ll give your pieces genuine metallic surfaces indistinguishable from traditionally crafted jewelry.
You’ll transform base materials like plastic or resin through electroplating, where electrochemical reactions deposit thin metal layers onto your pieces. Gold plating delivers luxurious aesthetics with excellent tarnish resistance, while silver and rhodium provide distinct visual qualities and varying durability levels.
Proper surface preparation is essential—you’ll need thorough cleaning and polishing to guarantee ideal adhesion and smooth finishes.
Beyond aesthetics, these metal plating techniques enhance corrosion resistance and wear durability, making your frequently worn pieces more resilient against harsh conditions while dramatically elevating their perceived value.
Surface Preparation Requirements
Achieving professional-grade plating results depends entirely on how well you prepare your 3D-printed surfaces beforehand.
Surface preparation is the foundation that determines whether your plating options will deliver the luxury finish your customers expect.
Your preparation process requires these essential steps:
- Deep cleaning – Remove all support material residue, oils, and printing artifacts using ultrasonic cleaners or specialized solvents.
- Progressive polishing – Sand from coarse to fine grits, working systematically to eliminate layer lines and surface imperfections.
- Final inspection – Check under magnification for any remaining flaws before proceeding to plating.
Materials like stainless steel 316 respond exceptionally well to thorough polishing, achieving a mirror-like smooth finish.
Quality Control Testing and Sample Validation
Although 3D printing technology has advanced considerably, establishing rigorous quality control testing remains essential for producing professional-grade jewelry.
Even with technological advances, professional jewelry production demands systematic quality control protocols to ensure precision and meet industry standards.
You’ll need to verify dimensions and tolerances against your CAD designs to confirm printed parts meet accuracy requirements for jewelry applications. Create test prints and sample pieces first to identify issues like layer misalignment or structural weaknesses before final production.
Conduct visual inspections to detect surface defects including layer lines, blemishes, or moiré effects that compromise aesthetic quality.
Perform mechanical stress tests to evaluate durability under real-world conditions. Document your calibration results for exposure times and printer settings to maintain consistency across multiple batches.
This systematic approach prevents costly errors and guarantees your jewelry meets professional standards.
Troubleshooting Common Print Quality Issues
When your 3D-printed jewelry exhibits layer adhesion problems, you’ll notice weak spots where layers separate easily or crack under minimal pressure.
Surface finish defects appear as visible layer lines, rough textures, or inconsistent surfaces that diminish your piece’s professional appearance.
These issues stem from incorrect printer settings, environmental factors, or material properties that you can identify and correct through systematic troubleshooting.
Layer Adhesion Problems
Poor layer adhesion represents one of the most frustrating defects you’ll encounter in 3D-printed jewelry, as it can cause your carefully designed pieces to split apart along layer lines during handling or wear.
To prevent layer adhesion problems and enhance your printing process, you’ll need to address several critical factors:
- Temperature Control: Maintain ideal print temperatures that allow layers to fuse completely, creating that satisfying bond you can see as each layer melds seamlessly into the next.
- Exposure Calibration: Fine-tune your resin exposure times until you achieve that perfect cure where layers lock together like interlocking puzzle pieces.
- Material Selection: Invest in high-quality materials with superior bonding properties that create strong, lasting connections between layers.
Regular printer calibration and environmental stability further enhance adhesion quality.
Surface Finish Defects
Surface finish defects can transform your meticulously designed jewelry pieces into disappointing, rough-textured artifacts that fail to meet professional standards.
These defects often stem from improper printer calibration—you’ll need to regularly check bed leveling, nozzle height, and material flow rates for consistent quality.
The moiré effect, caused by fine design elements interacting with printed layers, creates visual imperfections that you can mitigate by enhancing printer resolution and adjusting model orientation during slicing.
Layer lines represent the most common surface finish defects, but you can minimize them through post-processing techniques like sanding, polishing, or vapor smoothing.
Your material choice greatly impacts surface finish—polishing nylon PA12 achieves smooth, white finishes, while stainless steel benefits from polishing to enhance shine and reduce granularity.
Frequently Asked Questions
What Is the Best Material for 3D Printed Jewelry?
You’ll find stainless steel and bronze offer excellent strength and beauty for 3D-printed jewelry. Nylon PA12 provides smooth finishes and durability, while resin captures intricate details perfectly for complex designs.
How Can I Make My 3D Prints Better Quality?
You’ll improve print quality by calibrating your printer regularly, using fine layer heights, tilting models 45 degrees, selecting appropriate materials, and implementing thorough post-processing like sanding and polishing.
How to Reduce Material in 3D Printing?
You can reduce material in 3D printing by using hollow designs, lowering infill percentages, minimizing supports through smart orientation, choosing lighter materials, and optimizing layer heights for efficient printing.
Is It Safe to Wear 3D Printed Jewelry?
You can safely wear 3D printed jewelry if you choose skin-safe materials like nylon or properly processed resins. Test for allergies first, apply protective coatings, and maintain regular cleaning habits.

Leave a Reply